Reach Authentix Quickstart - Go
Sending an authentication token to a user and verifying his/her identity with the Reach Authentix API from TalkyLabs is made possible with just a few lines of Go code.
In what follows, we provide a step-by-step guide to facilitate your debut. In this quickstart, you will learn how to:
Sign up for the Reach platform
Create an applet
Retrieve your API credentials
Create an Authentix Configuration
Send an authentication token in different channels
Check the correctness of a provided authentication token
Sign-up / Sign-in
You can skip this section if you already have an account on the Reach platform.
You can sign up for an account on the Reach platform here. You will be asked to verify your email address to activate your account.
Create an applet
You can skip this section if you already have an applet and want to use it here.
An applet can be viewed as a subaccount or a development environment within the Reach platform. It allows you to regroup your operations in the Reach platform based on your customer segments, e.g., by country. You can have more than one applet associated with your account.
Creating an applet is just as simple as clicking a button and specifying the applet name as well as the operating country, that is the country where most of the customers targeted by the operations that will be performed under this applet reside.
Retrieve your API credentials
You can skip this section if you already know your credentials.
After accessing your applet, you can retrieve your API credentials by visiting Settings -> API from the left side menu.
As you will notice, you will gain access to your API User as well as your Test and Live API Key. Recall that the Test API key is for the sandbox mode where you can emulate sending messages while the Live API key is for sending messages for real.
Finally, note that it is possible to re-generate your API keys as you go.
Install the client library
You can skip this section if you already have the Go client library installed.
You have to make sure you have Go installed on your computer. This could be checked by running the following command:
go version
If it is installed, you would see something like:
go version go1.20.4 linux/amd64
Our Go client library supports Go 1.15+. To install it, you first need to start a new Go project. Create a Go project by running the command below:
go mod init reach-talkylabs-example
Then, move into the project folder reach-talkylabs-example and install the client library using:
go get github.com/talkylabs/reach-go
Create an Authentix Configuration
If you already have an Authentix Configuration that you want to use, you can skip this step and get straight to starting your first authentication process.
To be able to send authentication tokens to your customers, you need to have created an Authentix Configuration. This represents a set of settings used to define and send a message containing an authentication token to a user. Examples of settings include the code length, the service name, the message template.
Authentix Configurations can be created in two ways:
In the applet web console: Go to *Authentix -> Customization -> Configurations
Using the Authentix API
Go ahead and create an Authentix Configuration using one of these methods. Also note that only the Live API key can be used to create an Authentix Configuration via the API. Jot down the resulting Authentix Configuration Identifier.
Message templates
It is possible to define the message templates to be used by an Authentix Configuration when sending an authentication token to a user through a specific channel. If no message templates are provided, default ones will be used.
You can define message templates in the applet web console for every channel and associate them with your Authentix Configuration. Below are examples of message templates for both the sms and email channels.
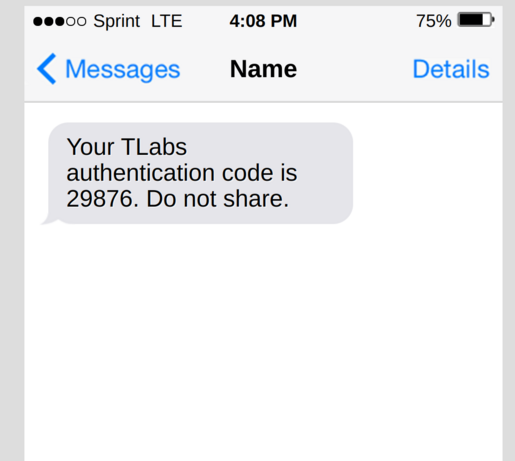
Example of a message template - SMS
This is an example of an SMS message template:
Your ${SERVICE_NAME} authentication code is ${CODE}. Do not share.
which would produce an SMS message that looks like:
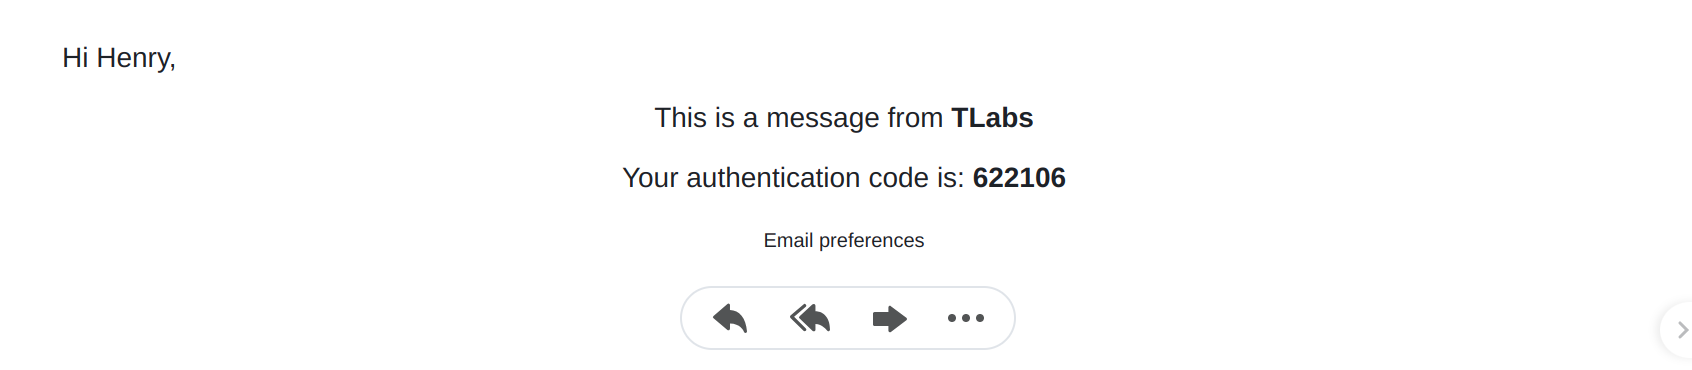
Example of a message template - Email
This is an example of an email message template:
<html>
  <head>
    <style type="text/css">
      body, p, div {
        font-family: Helvetica, Arial, sans-serif;
        font-size: 14px;
      }
      a {
        text-decoration: none;
      }
    </style>
    <title></title>
  </head>
  <body>
  <p>
    Hi ${CUSTOMER_NAME},
  </p>
  <center>

    <p>
      This is a message from <strong>${SERVICE_NAME}</strong>
    </p>
    <p>
      Your verification code is: <strong>${CODE}</strong>
    </p>
    <span style="font-size: 10px;"><a href=".">Email preferences</a></span>
  </center>
  </body>
</html>
which would produce an email message that looks like:
SMTP settings
To be able to send authentication tokens via the email channel, you need to define an SMTP setting in your Authentix Configuration. SMTP stands for Simple Mail Transfer Protocol and it is the protocol used for transfering emails.
You can define an SMTP setting in the applet web console and associate it with your Authentix Configuration. For an example of how to add your Gmail SMTP settings, see here.
Start an authentication process
Here, you will use the identifier of your Authentix Configuration to send an authetication code via a given channel.
The code sample below shows how to do this for the sms channel.
package main

import (
    "fmt"
    "os"
    "github.com/talkylabs/reach-go"
    reachAuthentix "github.com/talkylabs/reach-go/rest/api/authentix"
)

func main() {
    apiUser := os.Getenv("REACH_TALKYLABS_API_USER")
    apiKey := os.Getenv("REACH_TALKYLABS_API_KEY")

    client := reach.NewRestClientWithParams(reach.ClientParams{
        ApiUser: apiUser,
        ApiKey: apiKey,
    })

    params := &reachAuthentix.StartAuthenticationParams{}
    params.SetDest("+237671234567")
    params.SetChannel("sms")

    resp, err := client.Authentix.StartAuthentication("CIDXXXXXXXXXXXX", params)
    if err != nil {
        fmt.Println("Error: " + err.Error())
    } else {
        fmt.Println(resp.AuthenticationId)
    }
}
Replace the value in SetDest with the number you want to verify. The phone numbers must be in the E.164 format. Also, replace CIDXXXXXXXXXXXX with the identifier of your Authentix Configuration.
With the Test API key, you can only emulate sending authentication codes through SMS messages. If you want to send real SMS messages, consider using your Live API key.
If an SMTP setting is defined for your Authentix Configuration, you can then use the email channel. To send an authentication code via email, simply replace the value in SetDest with the email address you want to verify, and change the value in SetChannel to email.
For the email channel, you can only send authentication codes to your own email address when using the Test API key. If you want to verify other email addresses, consider using your Live API key.
Check the correctness of the code provided by your user
This section assumes that you received from your customer a code (here, 10234 in the example below) and you want to check if that code corresponds to the one sent previously.
The code sample below shows how to proceed:
package main

import (
    "fmt"
    "os"
    "github.com/talkylabs/reach-go"
    reachAuthentix "github.com/talkylabs/reach-go/rest/api/authentix"
)

func main() {
    apiUser := os.Getenv("REACH_TALKYLABS_API_USER")
    apiKey := os.Getenv("REACH_TALKYLABS_API_KEY")

    client := reach.NewRestClientWithParams(reach.ClientParams{
        ApiUser: apiUser,
        ApiKey: apiKey,
    })

    params := &reachAuthentix.CheckAuthenticationCodeParams{}
    params.SetCode("10234")
    params.SetDest("+237671234567")

    resp, err := client.Authentix.CheckAuthenticationCode("CIDXXXXXXXXXXXX", params)
    if err != nil {
        fmt.Println("Error: " + err.Error())
    } else {
        fmt.Println(resp.Status)
    }
}
The provided code is correct if the response status attribute value is passed. Again, replace CIDXXXXXXXXXXXX with the identifier of your Authentix Configuration, and the value in SetDest with either the phone number or the email address you want to verify. Finally, make sure to use the appropriate API key (this should be of the same nature, i.e. Live vs Test, as the one used to send the authentication code).
That's it! You can now verify your user identities using The Authentix API from TalkyLabs.